>Nell’articolo vediamo come realizzare un terminale che accetta comandi e che li esegue effettivamente su una macchina reale.
Questa prima parte si concentra sull’HTML, il codice Javascript e il CSS necessario.
La seconda parte verrà invece incentrata sul lato della programmazione python con il framework Django.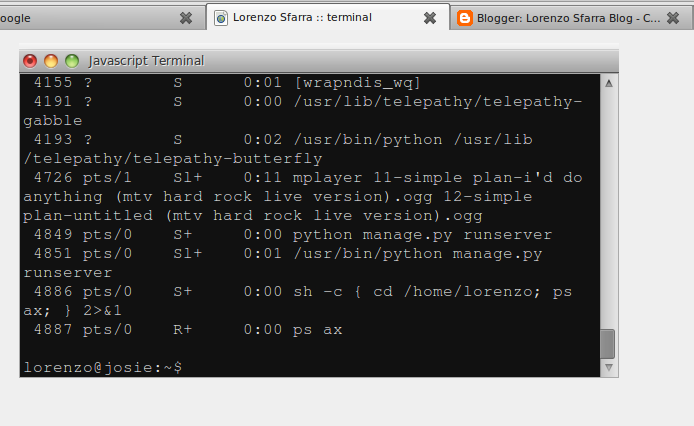 Il lato server è stato realizzato con il web framework Python Django, il lato client sfrutta la libreria JS JQuery anche per le chiamate AJAX.
L’HTML è piuttosto semplice e si trova nel file templates/index.html
<!DOCTYPE html PUBLIC "-//W3C//DTD XHTML 1.0 Strict//EN" "http://www.w3.org/TR/xhtml1/DTD/xhtml1-strict.dtd">
<html xmlns="http://www.w3.org/1999/xhtml" xml:lang="en-US" lang="en-US">
   <head>
       <title>Lorenzo Sfarra :: DJSterminal</title>
       <link rel="stylesheet" href="/media/css/terminal.css"/>
       <script type="text/javascript"
               src="https://www.google.com/jsapi"></script>
       <script type="text/javascript">
         // You may specify partial version numbers, such as "1" or "1.3",
         //  with the same result. Doing so will automatically load the
         //  latest version matching that partial revision pattern
         //  (e.g. 1.3 would load 1.3.2 today and 1 would load 1.4.2).
         google.load("jquery", "1.4.2");


       </script>

       <script src="/media/js/terminal.js" type="text/javascript">/* Terminal */</script>

       <script type="text/javascript">
         google.setOnLoadCallback(function() {
           /* Handle the enter keycode */
           $("#commandline").keypress(function(event) {
               if (event.keyCode == '13') {
                   event.preventDefault();
                   onEnterKey();
               }
           });
         });
       </script>
   </head>

   <body>
       <div id="terminal">
           <div id="terminaltop"><img src="/media/css/imgs/buttons.png" alt="buttons" align="left"/> <br/>Javascript Terminal</div>

<!-- Command line -->
           <textarea id="commandline" cols="80" rows="15">lorenzo@josie:~$ </textarea>
<!-- End command line -->
       </div>
   </body>
</html>
Nelle prime righe importiamo i file necessari. In particolare sfruttiamo Google per caricare la libreria JQuery.
Nelle linee 20-29 catturiamo il tasto Invio per gestire l’input come una riga di comando.
Il file terminal.js che contiene il sorgente javascript necessario si trova nella directory media/js, ed è il seguente:
/* Copyright (C) 2010 Lorenzo Sfarra (lorenzosfarra@ubuntu.com)

 * This program is free software; you can redistribute it and/or
 * modify it under the terms of the GNU General Public License
 * as published by the Free Software Foundation; either version 2
 * of the License, or (at your option) any later version.

 * This program is distributed in the hope that it will be useful,
 * but WITHOUT ANY WARRANTY; without even the implied warranty of
 * MERCHANTABILITY or FITNESS FOR A PARTICULAR PURPOSE. * See the
 * GNU General Public License for more details.

 * You should have received a copy of the GNU General Public License
 * along with this program; if not, write to the Free Software
 * Foundation, Inc., 51 Franklin Street, Fifth Floor, Boston, MA * 02110-1301, USA.
 */


// The command line prompt
var cliPrompt = "lorenzo@josie:~$ ";

// the server address where the real console exists
var cliHost = "http://localhost:8000/";

function isTrustedCommand(command) {
    /**
     * Function to check that the given command is trusted.
     * @param command the command to check
     * @return boolean
     */
    // TODO: check that this is a trusted command!
    return true;
}

function executeCommand(text, cliPrompt, command) {
    /**
     * Function to execute the given command through an AJAX call
     * and retrieve the result to update the textarea value.
     * @param text the current textarea value
     * @param cliPrompt the prompt
     * @param command the command to execute
     */
    // build the URL for the command
    remoteCommand = cliHost + "cmd/" + command;
    output = "";
    // Perform the AJAX call
    $.ajax({
        url: remoteCommand,
        type: 'GET',
        dataType: 'text',
        error: function(data, textStatus, errorThrown) {
            // readyState == 4? Error.
            if (data.readyState == 4) {
                output = "Connection error.\n"
            }
        },
        success: function(data) {
            output = data + "\n";
            $("#commandline").val([text, output, cliPrompt].join("\n"));
            // Textarea with focus at bottom
            $("#commandline").animate({ scrollTop: 99999}, 10);
        }
    });

}

function onEnterKey() {
    /* Function called when a user press the Enter key on its keyboard. */
    text = $("#commandline").val();
    // Get the command
    promptIndex = text.lastIndexOf(cliPrompt);
    // build the command
    command = text.substring(promptIndex + cliPrompt.length);
    if (command == "clear") {
        // simply clear the textarea value
        $("#commandline").val(cliPrompt);
    } else if (isTrustedCommand(command)) {
        executeCommand(text, cliPrompt, command);
    } else {
        output = "Invalid command.";
        $("#commandline").val([text,output,cliPrompt].join("\n"));
    }
}
La funzione principale è ovviamente executeCommand() che effettua la chiamata AJAX necessaria per eseguire realmente il comando sul server di riferimento.
ATTENZIONE: una funzione importantissima è isTrustedCommand(command) che ritorna “true” se il comando ha il “permesso” per essere eseguito. Questo ovviamente è necessario per proteggere il server. Al momento la funzione non effettua alcun controllo e ritorna immediatamente “true”.
Il foglio di stile terminal.css si trova nella directory media/css.
Passa alla parte II ».
Per lo stile è stato preso come modello di riferimento il terminale presente nell’articolo “Forwarding E-Mails with Postfix”.
0 Comments Leave a comment